
Training Yolo v3 model using custom dataset on Google colab

YOLO (You Only Look Once) trades some accuracy for speed. Instead of running a classifier at multiple locations and scales, YOLO applies a single neural network to the full image. The network divides the image into regions and predicts bounding boxes and class probabilities simultaneously.
YOLO v3 uses Darknet, which has a 53-layer network trained on ImageNet. For detection, another 53 layers are stacked on top, giving 106 layers total.
<img src=”/assets/images/yolo/yolo-architecture.webp” alt=”yolo architecture” class=”img-fluid”
1
loading="lazy" decoding="async"   >
Creating a Dataset
You need labeled images. HyperLabel works well for this. I’ve also put a sample dataset here if you want to skip ahead.
Upload your dataset to Google Drive.
Training Notebook
I’ve prepared a Colab notebook you can download.
Open it in Colab and set the runtime to GPU. Update the dataset path to match your Google Drive location:

The notebook clones Darknet and compiles it, then downloads and unzips your dataset.
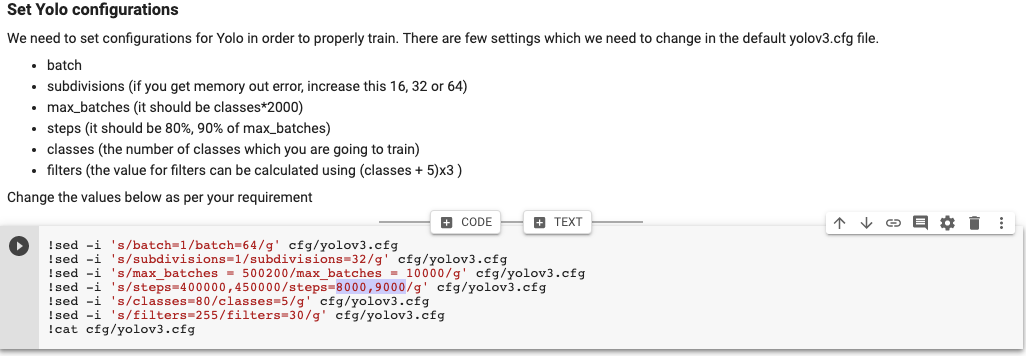
Configuration
Several values in the YOLO config need to match your dataset:
- batch: Training batch size
- subdivisions: Increase to 16, 32, or 64 if you get out-of-memory errors
- max_batches: classes × 2000 (the model trains until this many batches)
- steps: 80% and 90% of max_batches (learning rate drops at these points)
- classes: Number of object classes you’re training
- filters: (classes + 5) × 3 in the layers before each YOLO layer
For 5 classes:
- max_batches = 5 × 2000 = 10000
- steps = 8000, 9000
-
filters = (5 + 5) × 3 = 30

Training
Run this cell:
1
./darknet detector train data/obj.data cfg/yolov3.cfg darknet53.conv.74
This takes a while depending on your dataset size and Colab’s GPU allocation.
Running Inference
After training completes, test your model:
1
./darknet detector test data/obj.data cfg/yolov3.cfg backup/yolov3_last.weights data/img/output-000000598.jpg
This creates predictions.jpg with bounding boxes drawn:
